
If you do not know about GreenSock, please visit their site here and try the html5 version including TweenLite, TweenMax, TimelineLite, TimelineMax, Draggable, and SplitText. You will be amazed at what it can do for you.
I was looking for a way to drag a button on a old style radio dial but there seemed to be no way to do that with jquery-UI draggable. However, in my search for an answer, I stumbled upon Draggable by GreenSock and it was exactly what I wanted. For a realistic spin like the one existing in a wheel of fortune for example, you will need to subscribe to the "Shockingly Green" club in order to get the throwprops plugin which is included in the plugins package you automatically get as a club member. You can use draggable.js by itself for the circular drag. If you have any question, there is a forum on GreenSock.com where you will find great help.
In this sample, I used two wheels, a small wheel and a big wheel that are synchronized. I have to admit, I had to have some help with the code for the synchronization of the 2 'wheels' and Jack, the owner of GreenSock was very helpful.
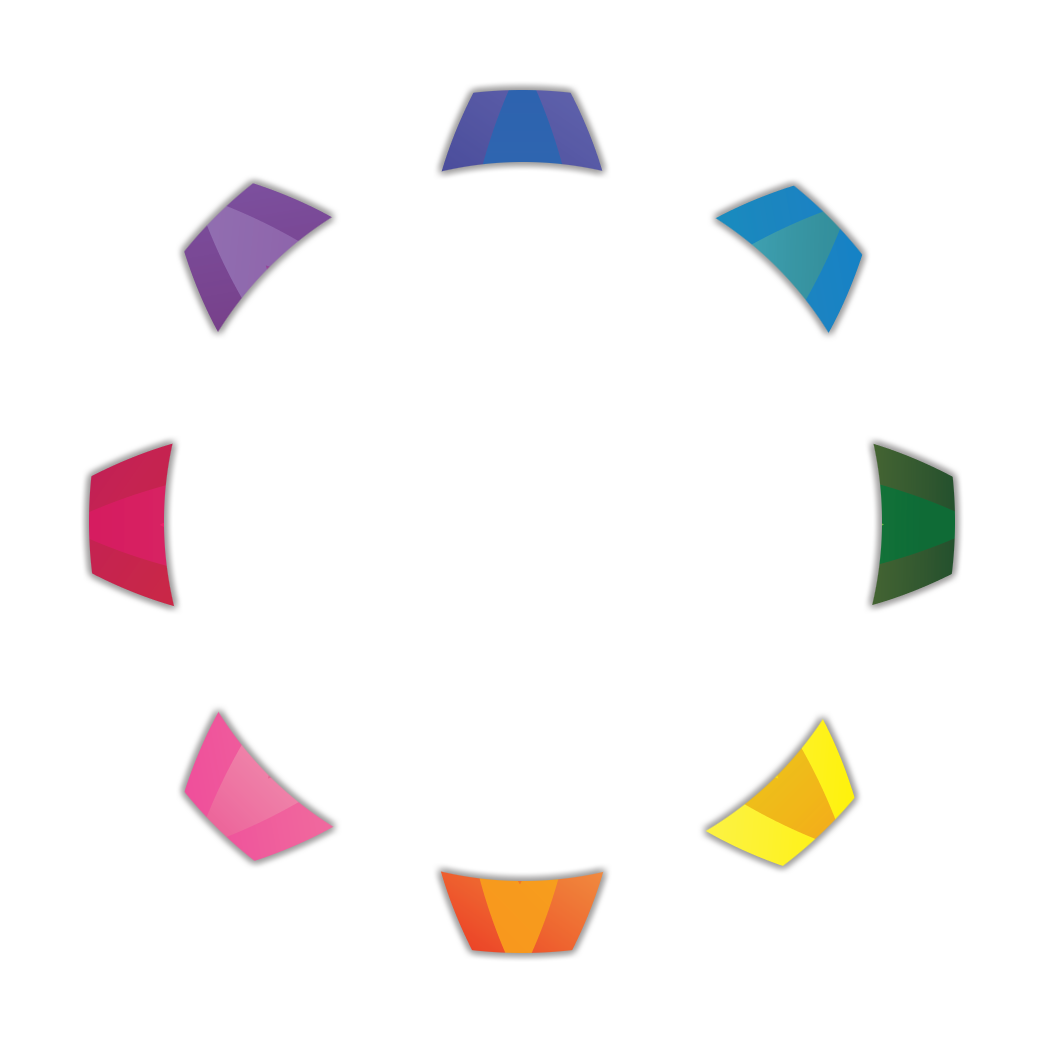
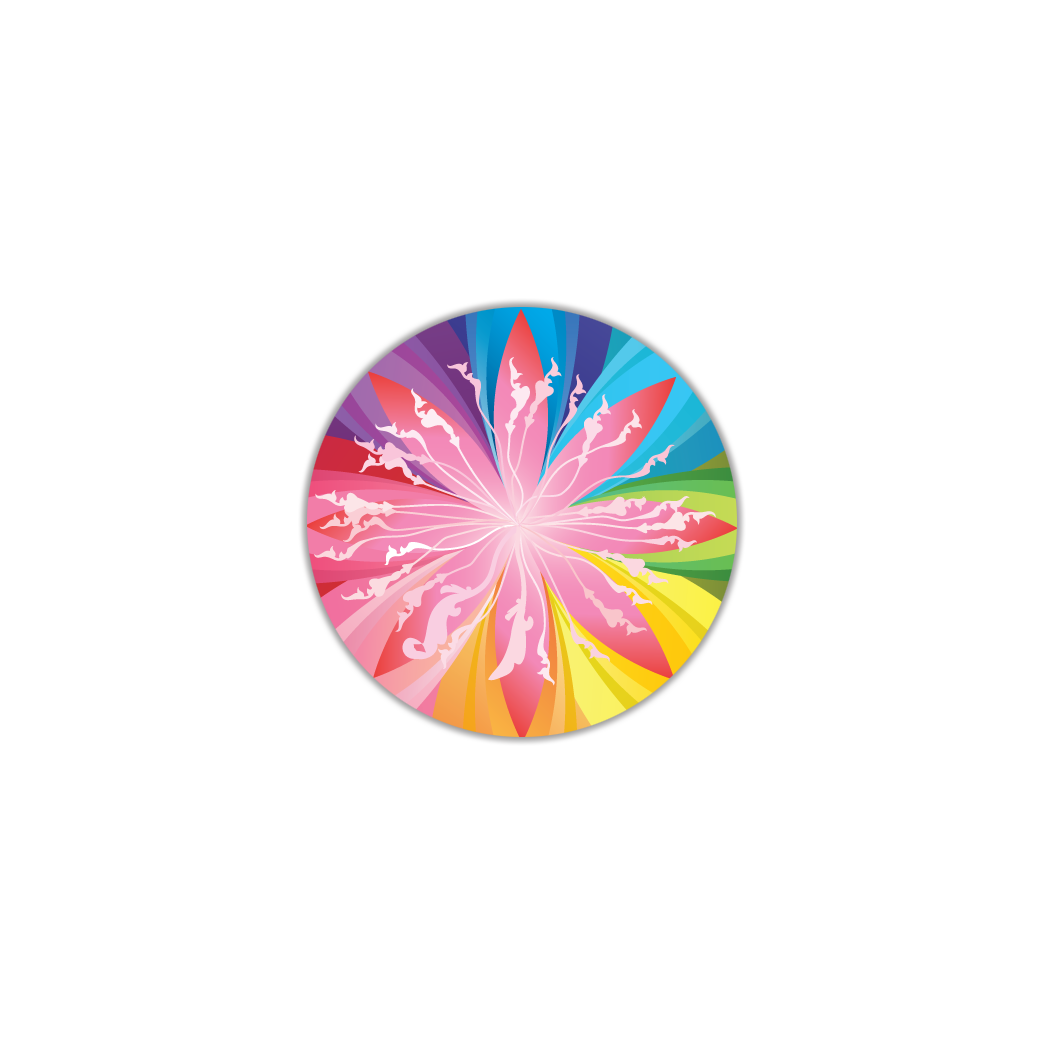
You might want to ask: "Why 2 wheels?" The reason is that the original design was about the 'Wheel of Emotions' and since we are publishing a small stage of 400 x 600, there was not enough room to place the larger wheel to be seen entirely. So the idea was to set up the stage where the student could see only part of the large wheel and could activate it by spinning the small wheel. I also wanted the wheel to stop on a 'petal' rather than between two of them and this is when GreenSock is doing a great job. Last the addition of the throwprops plugin made the animation smooth and credible.
Note: the example for this tutorial is a simplified version of the original illustration "The Wheel of Emotions" created for a high school course. It covered all the different emotions and had more information for students to explore. If you are interested in the subject, while I was investigating the wheel of emotions, I found a really cool graphic here.
So let's get to work!
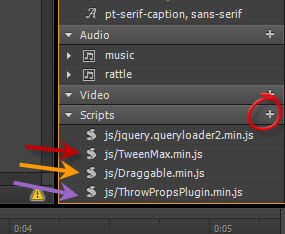
In order for the plugins to work, you will need to load the scripts through the script loading panel in the library situated on the right side of your work space. Depending what your work environment requires, you can either use the CDN link or you can download the zipped file and add the files from your drive. This will automatically create a js folder and move the plugin into it.
First, click on the plus sign, next on the Scripts tab. Then choose "Add from Disk" or "Add from URL". Often the order in which script files load is important. I recommend that you check out the documentation of any plugin to see which load order you should use, as well as its possible dependencies. Some plugins, for example, depend on jquery-UI.
script loading from URL
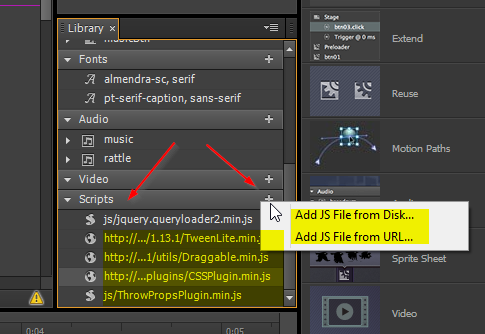
script loading from file
Next, place your images on the desired spot on the stage. I used png files because I needed a transparent background.
The first thing I wanted to do is add a fun animation for the big wheel, so I decided to cut the original image into 5 concentric wheels from the inner small circle to the outer circle.

Wheel 1
wheel 2
wheel 3
wheel 4
wheel 5
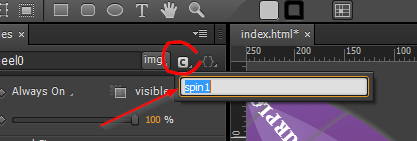
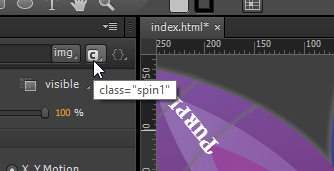
Next, I wanted each image to spin 360 degrees in a different direction. I could have used the normal css properties for rotation as shown below by adding class names, for example spin1 and spin2 to the 5 images, then define the css properties for the 2 classes. Remember that any element that uses a class name gets the properties assigned to that class.
A class name is preceeded with a period, for example sym.$(".spin1") means an element that has the class spin1 assigned to it. In EA, you assign the class to an element in the left panel.
Below I show how to code this with css transform but you can skip this and go directly to the adapted code for the same effect with GreenSock.
Each class rotates an image in a different direction, clockwise (360°) or counterclock (-360°).
function spin(){
	sym.$(".spin1").css({
    	"transform": "rotate(360deg)",
        "-webkit-transform": "rotate(360deg)",
        "transition": " 2s ease",
        "-webkit-transition": " 2s ease"
        });
	sym.$(".spin2").css({
    	"transform": "rotate(-360deg)",
    	"-webkit-transform": "rotate(-360deg)",
    	"transition": " 2s ease",
    	"-webkit-transition": " 2s ease"
    });
}
If you wanted to reuse this function with different degree numbers, you could add a parameter. For example this function can be rewritten as shown below. Later you could use spin(100) to rotate an element 100 degrees.
function spin(degrees){
	sym.$(".spin1").css({
    	"transform": "rotate("+degrees+"deg)",
      "-webkit-transform": "rotate("+degrees+"deg)",
      "transition": " 2s ease",
      "-webkit-transition": " 2s ease"
        });
	sym.$(".spin2").css({
    	"transform": "rotate("+(-degrees)+"deg)",
    	"-webkit-transform": "rotate("+(-degrees)+"deg)",
    	"transition": " 2s ease",
    	"-webkit-transition": " 2s ease"
    });
}

spin(100);
set up in EA
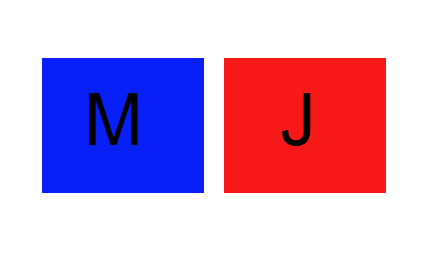
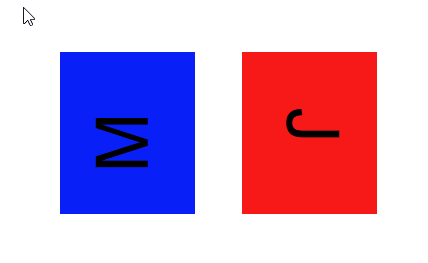
applied rotate function for 90 (M) and -90 (J) degrees

However, one of the really cool capabilities of the GreenSock CSSplugin is that you do not have to add all the vendor prefixes usually necessary in CSS, saving a large amount of lines in your code. The CSSplugin handles most properties without any problem, "rotate" being one of them.
I created a function to rotate the different parts of the big wheel and use the visual effect where I wanted it to occur–in this particular case spinning the small wheel.
Note: As in the example above, I use the 'degree' parameter be able to change the value as needed: 360 spins in one direction and -360 resets the rotation. (newbies: I chose to name the function parameter 'degree' but I could have used 'greenelephant' or anything else instead. 'degree' is a placeholder for a value).
var wheel0 = sym.$("wheel0");
  // asign variable names to the elements to use them later
var wheel1 = sym.$("wheel1");
var wheel2 = sym.$("wheel2");
var wheel3 = sym.$("wheel3");
var wheel4 = sym.$("wheel4");
var smallWheel = sym.$('smallWheel');
var bigWheel = sym.$('bigWheel');
// this will make the visual effect for the big wheel
// using GreenSock cssplugin for rotation property
function spin(degree){
TweenLite.to(wheel0, 2, {rotation:degree});
TweenLite.to(wheel1, 2, {rotation:-degree});
TweenLite.to(wheel2, 2, {rotation:degree});
TweenLite.to(wheel3, 2, {rotation:-degree});
TweenLite.to(wheel4, 2, {rotation:degree});
}
I wanted to have the wheel stop at any 45 degree angle contained in a circle. The most simple way would have been to use the following:
var rotationSnap = 45;
GreenSock makes it easy to add the draggable code to an element. Below is the generic format:
  var test = sym.$("elementName");
  Draggable.create(test, {
  	type: "rotation",
	snap: function(endValue){
    // insert desired code here
    }

  });
This code applied to a rotation of 45 degrees would be:
Draggable.create(smallWheel, {
	type: rotation,
	snap: function(endValue){
	return 	Math.round(endValue/rotationSnap)*rotationSnap;
    }
    });
Note: The function for snap is triggered when the user releases the mouse.
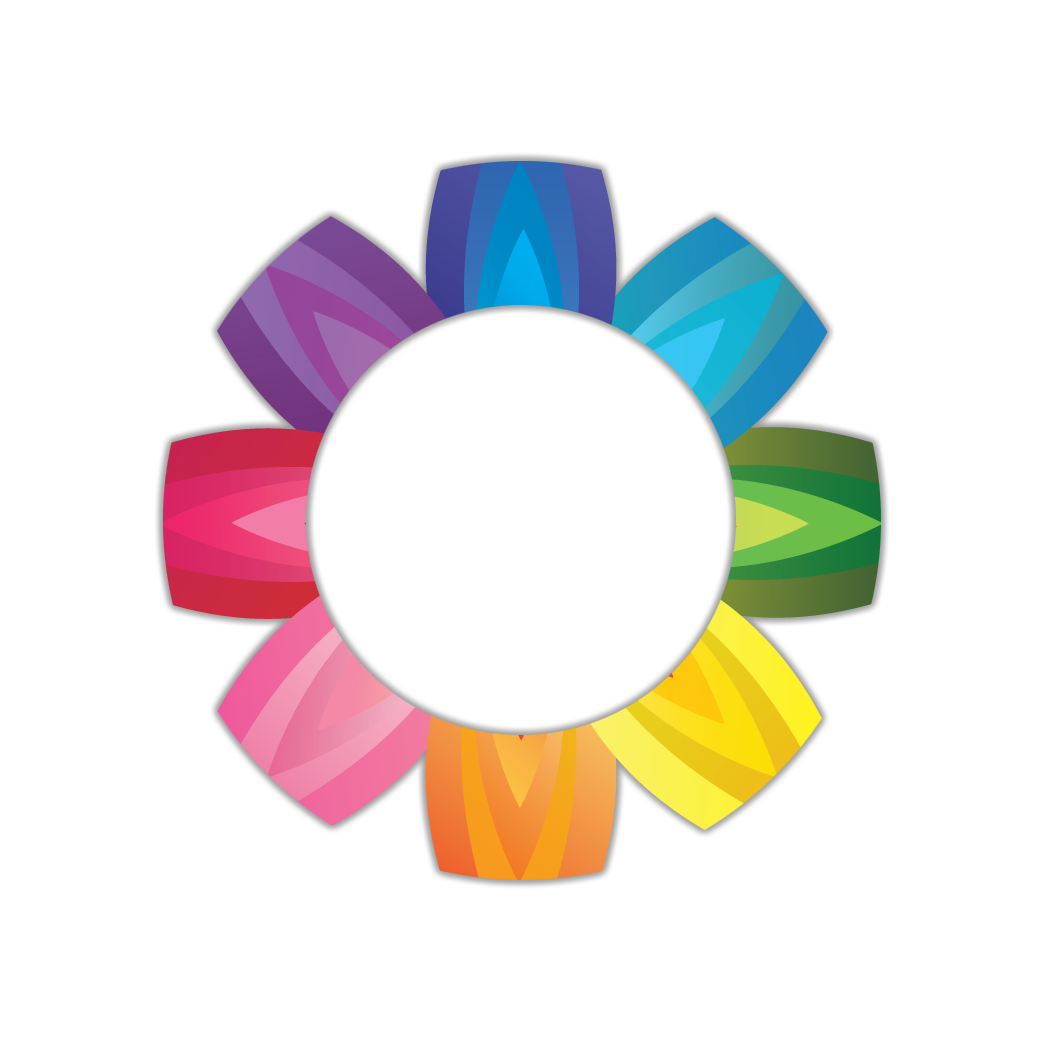
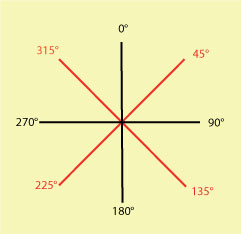
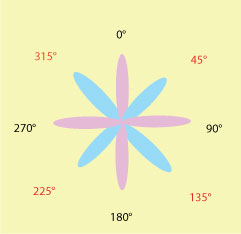
Why 45 degrees? The flower contains 8 petals that are placed at equal distance obtained by dividing a circle in 4, then in 4 again as shown in the image below.
Instead of the code above, you can use an array like the one below. The numbers are multiples of 45, but any values could be used.
var dialarray = [0,45,90,135,180,225,270,315]; Draggable has a number of properties and methods that can be accessed (see list here ) so it is very easy to control your elements. Making a number of elements draggable can be done by giving them a class name (for example myDraggables) and use: Draggable.create(".myDraggables"). Simple!
There are several things I wanted to happen when the small wheel would spin.
The function to sync both wheel is the following:
  var smallDraggable = Draggable.get(smallWheel);
function syncBigWheel() {
	TweenLite.set(bigWheel, {rotation:smallDraggable.rotation});
}
Draggable is assigned to smallWheel. Then calculations are made for snap so that smallWheel will stop at any 45 degree increment.
  snap:function(originalValue) {
		// suppress originalValue to 0-360
  		var endValue = Math.round(originalValue % 360);
  		// change negative degree to positive
  		if(endValue < 0){
    		endValue = 360 + endValue;
  		}
  		// get closest value from array
  		var arrayValue = parseFloat(closestDeg(endValue, dialarray));
  		// get extra rotations to add to our arrayValue
  		var addValue = Math.floor((originalValue - arrayValue) / 360) * 360;
  		// adjust for shortest rotation
  		if((endValue-arrayValue+360)%360>180){
    		addValue += 360;
  		}
  		return arrayValue + addValue;
	}

    // closestDeg function used above in arrayValue
function closestDeg(num, arr) {
	var ds = arr.map(function(b) {
    	var d = Math.abs(num - b);
    	return d > 180 ? 360 - d : d;
  });
  return arr[ds.indexOf(Math.min.apply(null, ds))];
};
onDrag the rattle sound is played, the text buttons are hidden and the big wheel is set to sync with the small wheel.
    onDrag :function() {
		sym.$("rattle")[0].play();
		buttons.hide();
		spin(360);
		TweenLite.set(bigWheel, {rotation:smallDraggable.rotation});
	},
onThrowUpdate the big wheel syncs.
onThrowUpdate: syncBigWheel,
onDragEnd the sound is paused, the buttons show and the big wheel spins back.
    	onDragEnd: function(){
		sym.$("rattle")[0].pause();
		buttons.show();
		spin(-360);
	}
Below are the wheels in action as well as the entire code.
var dialarray = [0,45,90,135,180,225,270,315];

//
Draggable.create(smallWheel, {
	type:"rotation",
	throwProps:true,
	snap:snap,
	onDragStart: function() {
		sym.$("rattle")[0].play();
		buttons.hide();
		spin(360);
	},
   onDrag :syncBigWheel,
	onThrowUpdate: syncBigWheel,
	onDragEnd: function(){
		sym.$("rattle")[0].pause();
		buttons.show();
		spin(-360);
	}
});

Draggable.create(bigWheel, {
	type:"rotation",
	throwProps:true,
	snap:snap,
	onDrag:syncSmallWheel,
	onThrowUpdate:syncSmallWheel
});

var smallDraggable = Draggable.get(smallWheel);
var bigDraggable = Draggable.get(bigWheel);
function syncBigWheel() {
	TweenLite.set(bigWheel, {rotation:smallDraggable.rotation});
}
function syncSmallWheel() {
	TweenLite.set(smallWheel, {rotation:bigDraggable.rotation});
}

function snap(originalValue) {
		// suppress originalValue to 0-360
  		var endValue = Math.round(originalValue % 360);
  		// change negative degree to positive
  		if(endValue < 0){
    		endValue = 360 + endValue;
  		}
  		// get closest value from array
  		var arrayValue = parseFloat(closestDeg(endValue, dialarray));
  		// get extra rotations to add to our arrayValue
  		var addValue = Math.floor((originalValue - arrayValue) / 360) * 360;
  		// adjust for shortest rotation
  		if((endValue-arrayValue+360)%360>180){
    		addValue += 360;
  		}
  		return arrayValue + addValue;
}

function closestDeg(num, arr) {
  var ds = arr.map(function(b) {
    var d = Math.abs(num - b);
    return d > 180 ? 360 - d : d;
  });
  return arr[ds.indexOf(Math.min.apply(null, ds))];
};
Note: the sample available for download does not contain the Shockingly Green Club plugins which can be obtained with the Shockingly Green Club.